EndNote Online

EndNote Online related FAQ items.
1. Can we add an Output Style to EndNote Online or myendnoteweb
Any user can add a new style to EndNote on the desktop by placing the new style in one of the EndNote styles folders (setup folder\styles or private folder, see Edit-Preferences-Folder Locations-Styles), but only an EndNote administrator for a site license can upload a new style to EndNote basic/online using the administrator tools.
2. EndNote X7 and X8 CWYW and MS Word 2016 for Mac: Compatibility and Recommendations

EndNote 21 is now available: Buy EndNote 21 today

Please also see:

01-09-2016: Attention: EndNote X7.7 for Windows and Mac has been released

This release contains:

  • Online Search, Find Full Text and Find Reference Update with PubMed via Secure Socket Layer (SSL)
  • Using short form, include the title field only when needed to disambiguate a citation
  • Cite While You Write improvements, including track changes and format multiple citations via EndNote online
  • Importing PDFs


24-08-2016: Attention: EndNote X7.6 for Mac has been released

This release contains:

  • 64-bit version of Cite While You Write for Microsoft Word 2016.
  • Compatibility with Adobe Acrobat Pro DC after updating Microsoft Word 2016 to version 15.24.

Buy the new EndNote X7.6 for Mac Full or the EndNote X7.6 for Mac Upgrade (requires a X5 or X6 license) or if you are a student the full EndNote X7.6 for Mac Student edition.

If you already have an existing X7 license, follow the instructions below to obtain the latest release:

Get the latest update to X7, featuring a fully 64-bit version of Cite While You Write for Microsoft® Word 2016. EndNote X7 can automatically update, but if you need to manually update, you can follow these steps:

Mac OS X - It is recommended that you use Program Updates.

  1. Close all programs and turn off any background software, such as virus protection software.
  2. From within EndNote, click on the 'EndNote X7' Menu and choose 'Check for Updates' then follow the on-screen prompts.
  3. Once the process is done, click on the 'EndNote X7' Menu and choose 'Check for Updates' to see if there are any more updates to run.

Check your current version:

  1. Open EndNote.
  2. Click on the 'EndNote X7' Menu and choose 'About EndNote'
  3. If this reads EndNote X7.6 (Bld 11666), you have the latest version of EndNote installed.

07-07-2016: Attention: X7 Mac and Word Insiders version 15.25.0 compatibility

Microsoft released version 15.25.0 of Office 2016 to their Mac Insider Fast channel. Version 15.25.0 of Word 2016 is fully 64-bit.

EndNote X7 Mac users who upgrade to version 15.25.0 of Word 2016 will find that this release impacts the Cite While You Write plug in, resulting in a Word dialog that reads:
"Word was unable to load an add-in
Your add-in isn’t compatible with this version of Word. Please contact the add-in provider for an update. (EndNote CWYW Word 2016.bundle)"

For now there is a beta plug in available for users with Word 2016 version 15.25.0.
The 64-bit X7 Mac Cite While You Write beta plug is available trough the beta signup: endnote.com/betasignup
Please note that you can use the Thomson Reuters Community Forums if you are experiencing any issues with this beta plug in.


24-05-2016: Update Word 2016 to version 15.22.1

Mac OS X 10.11 and Mac OS X 10.10: Microsoft has addressed the issues below with an update, so when you update Word 2016 to version 15.22.1 that will resolve these issues.
To update Word, go to the help menu in Word and choose 'Check for updates' and follow the prompts.

  • EndNote X7 Mac: COM Exception with Word 2016 version 15.22

    Users with Word 2016 who have updated to version 15.22 will receive the following message when trying to use the EndNote X7 Cite While You Write commands:
    A COM Exception has occurred. One of the values passed to this method or property is out of range.
     
  • Users of EndNote X7.5.1.1 or X7.5.3. and Word 2016 15.21.1 or 15.22 on Mac OS X 10.10 (Yosemite) may get "error -600" using CWYW.
     

12-05-2016: EndNote X7 Mac: COM Exception with Word 2016 version 15.22

Users with Word 2016 who have updated to version 15.22 will receive the following message when trying to use the EndNote X7 Cite While You Write commands: A COM Exception has occurred. One of the values passed to this method or property is out of range.

Mac OS X 10.11 (El Capitan): The current workaround is to downgrade Word to version 15.21.1. To roll back to a previous version, place the Microsoft Word found the Applications folder in the trash and download and run the Word 2016 15.21.1 installer from here:
http://officecdn.microsoft.com/pr/C1297A47-86C4-4C1F-97FA-950631F94777/OfficeMac/Microsoft_Word_15.21.1_160411_Updater.pkg

MAC OS 10.10 (Yosemite): The current workaround is to downgrade Word to version 15.20. To roll back to a previous version, place the Microsoft Word found the Applications folder in the trash and download and run the Word 2016 15.20 installer from here:
http://officecdn.microsoft.com/pr/C1297A47-86C4-4C1F-97FA-950631F94777/OfficeMac/Microsoft_Word_15.20.0_160315_Updater.pkg


02-05-2016: EndNote X7.5.3 for Mac released

18-02-2016: EndNote X7.5.1.1 Mac released

[Please mind. If somehow your word cannot be opened or crashes while opening (because you have played around with preferences files of MS Word and/or EndNote): Hold down the [Shift]  key while starting MS Word to open it in save mode to fix it.]

  1. Update EndNote X7 to X7.5.1.1 (Build 11914).  In EndNote, click on the EndNote menu and select 'About EndNote X7.x'. Update: In EndNote, click on the EndNote menu and select 'Check for updates...'.
  2. Make sure you have updated MS Word 365 / 2016 to the latest edition  15.19.1 (In Word, click on the Word menu and select 'About Word'). Under 'Help' you will see the 'Update' menu item. If the MS Word Auto Update is not able to locate latest version for some reason, you can update manually via https://support.microsoft.com/en-us/kb/3134241.
  3. If you have updated your EndNote to X7.5.1.1 and your MS Word to for Mac to version 15.19.1, then please see FAQ of Thomson:

    http://endnote.com/kb/138936

    Especially the section below (part of above FAQ item):

    1. Important: Backup first, create a compressed backup of the library [File - Compressed library (.enlx) ...].
    2. Quit EndNote and Word.
    3. Hold down the "option" key on your keyboard and go to the "Go" Menu and choose "Library" then open the "Preferences" folder.
    4. Remove the "com.ThomsonResearchSoft.EndNote.plist" file.
    5. Browse to is the "[Hard Drive Name] : Library : Application Support : Microsoft : Office365 : User Content : Startup : Word" folder.
    6. Delete the "EndNote CWYW Word 2016.bundle" file.
    7. Launch EndNote X7.
    8. Run the Customizer to install the Cite While You Write tools. [With EndNote online, run the CWYW_Installer in the Cite While You Write folder in applications].

If the EndNote CWYW add-in toolbar/ribbon still does not appear in MS Word 365 / MS Word 2016, please check the 'User Templates' file location. Especially, if you have used MS Word 2011 on the same machine and now switched to MS Word 2016, the 'User Templates' folder could point to an old location:

Change from:

Users/[username]/Library/Application Support/Microsoft/Office/User Templates

~\Library\Application Support\Microsoft\Office\User Templates

Change to:

Users/[username]/Library/Group Containers > UBF8Y34639G.office > User Content > Templates

~\Library\Group Containers\UBF8T346G9.Office\User Content\Templates

Please make sure you have the 'User Templates' folder defined correctly in MS Word 2016 preferences.

  1. Start Word, go to 'Word > Preferences'
  2. Click on 'File Locations'.
  3. Select 'User Templates' and click 'Modify'.
    Point to the 'Users/[username]/Library/Group Containers > UBF8Y34639G.office > User Content > Templates' folder.

03-02-2016: EndNote X7.5 Mac released

This release contains features, critical updates, optimizations and other improvements for:

- Cite While You Write for Microsoft Word 2016
- Compatibility with OS X El Capitan®
- Sync
- Restored Direct Export functionality for OS X Snow Leopard®

Installing EndNote X7.5 for Mac:

Follow the popup screen instructions after starting EndNote X7 Mac or choose 'Check for Updates' in EndNote X7, under the 'EndNote' menu.

22-01-2016: Thank you very much for all of your great comments on the EndNote X7.5 Word for Mac beta! Your feedback has made a real impact on our development, and has helped make this version of EndNote a better product for all EndNote users. New bug reporting for the X7.5 release is now closed. Stay tuned! The EndNote X7.5 release is getting close- we will let you know the exact date soon! Sincerely, The EndNote Team

23-12-2015: Attention EndNote X7 Mac users! The EndNote Team has released a new version of the Beta for EndNote X7 CWYW for Mac, now with MS Word Ribbon integration! Go to endnote.com/betasignup to download the new version and let us know what you find. The EndNote Team

20-11-2015: Attention EndNote X7 Mac users! Testing on Beta builds of Cite While You Write for Word 2016 for Mac will begin on Monday, November 30th 2015. All users who have signed up via http://bit.ly/1P51se9 will receive an email with instructions at that time. We look forward to your input!

Cite While You Write is not currently compatible with Office 2016 on Macintosh.

Thomson Reuters is actively developing a patch for EndNote X7 to fix this compatibility issue. Thomson Reuters anticipates this free update to X7 to be ready by the Fall. Thomson Reuters understands EndNote's importance in completing your work and apologize for any inconvenience caused. To support Mac workflows as we develop the patch, Thomson Reuters has the following recommendations to help Microsoft Office 365 users continue to create formatted citations and bibliographies in Microsoft Word.

It is possible to have both Office 2011 and Office 2016 on the same computer. If you want or need to install Office 2016, the recommendations outlined below will enable your continued use of EndNote to create formatted citations and bibliographies in your Word documents.

Recommendations for Mac users with Microsoft Word 2016 or those considering upgrading to Microsoft Word 2016 for Mac


If you are using Office 2016 through an Office 365 Home Premium subscription:

  • Do not uninstall Office 2011 before installing Office 2016.
  • After installing Office 2016 the Office 2011 icons will be removed from the Dock but the applications will still be available in the Applications/Office 2011 folder. You can drag these icons to the Dock if you want to easily access Office 2011 as well as Office 2016.
  • You can insert temporary citations into an Office 2016 document from EndNote by highlighting the citations in EndNote and pressing Command-C to copy, then place your cursor in the Word 2016 document at the location you want to paste the citations and pressing Command-V to paste. You can also drag-and-drop the citations. When you are ready to format the citations, close the document in Office 2016 and open it in Office 2011, where the EndNote commands are available. You can then format the document as usual. The citations and bibliography should be converted to unformatted citations if the document will be edited again in Office 2016. Please note that Cite While You Write requires you to save Word documents on your computer. Working with documents stored only online is not supported.
  • If you have uninstalled Office 2011 before installing Office 2016 and have a copy of your original Office 2011 installer, you can reinstall Office 2011 using that installer. You will need to run the Customizer (EndNote>Customizer) in EndNote to install CWYW for Office 2011 after reinstalling.
  • If you have uninstalled Office 2011 before installing Office 2016 and do not have a copy of your original Office 2011 installer, you can re-download the installer.
  1. In your browser, log into your Microsoft account.
  2. Click on your name in the toolbar and select Account Settings.
  3. Click Services and Subscriptions.
  4. Click Office 365 Settings.
  5. Click the red Install button.
  6. Click Install previous version next to the red Install button.
  7. Pick your language option from the drop-down list and click the red Install button to download Office 2011 and install it.
  8. You will need to run the Customizer (EndNote>Customizer) in EndNote to install CWYW for Office 2011 after reinstalling.


If you are using Office 2016 through an Office 365 Business edition subscription:

  • Do not uninstall Office 2011 before installing Office 2016.
  • After installing Office 2016 the Office 2011 icons will be removed from the Dock but the applications will still be available in the Applications/Office 2011 folder. You can drag these icons to the Dock if you want to easily access Office 2011 as well as Office 2016.
  • You can insert temporary citations into an Office 2016 document from EndNote by highlighting the citations in EndNote and pressing Command-C to copy, then place your cursor in the Word 2016 document at the location you want to paste the citations and pressing Command-V to paste. When you are ready to format the citations, close the document in Office 2016 and open it in Office 2011, where the EndNote commands are available. You can then format the document as usual. The citations and bibliography should be converted to unformatted citations if the document will be edited again in Office 2016. Please note that Cite While You Write requires you to save Word documents on your computer. Working with documents stored only online is not supported.
  • If you have uninstalled Office 2011 before installing Office 2016 and have a copy of your original Office 2011 installer, you can reinstall Office 2011 using that installer. You will need to run the Customizer (EndNote>Customizer) in EndNote to install CWYW for Office 2011 after reinstalling.
  • If you have uninstalled Office 2011 before installing Office 2016 and do not have a copy of your original Office 2011 installer, Microsoft does not currently provide a link in Office 365 to download a previous version of Office. It is still possible to insert EndNote temporary citations into a Word document, then save a copy of that document as a Rich Text Format (RTF) document, and use EndNote’s Tools>Format Paper command to create a second paper with formatted citations and bibliography. Please see this article for instructions on using Format Paper.


If you have never installed Office 2016 and have an Office 365 Home Premium subscription:

  • To install Office 2011 as well as Office 2016, after installing Office 2016, follow the steps below.
    1. In your browser, log into your Microsoft account. 
    2. Click on your name in the toolbar and select Account Settings.
    3. Click Services and Subscriptions.
    4. Click Office 365 Settings.
    5. Click the red Install button.
    6. Click Install previous version next to the red Install button.
    7. Pick your language option from the drop-down list and click the red Install button to download Office 2011 and install it.
    8. You will need to run the Customizer (EndNote>Customizer) in EndNote to install CWYW for Office 2011 after reinstalling.
  • You can insert temporary citations into an Office 2016 document from EndNote by highlighting the citations in EndNote and pressing Command-C to copy, then place your cursor in the Word 2016 document at the location you want to paste the citations and pressing Command-V to paste. You can also drag-and-drop the citations. When you are ready to format the citations, close the document in Office 2016 and open it in Office 2011, where the EndNote commands are available. You can then format the document as usual. The citations and bibliography should be converted to unformatted citations if the document will be edited again in Office 2016. Please note that Cite While You Write requires you to save Word documents on your computer. Working with documents stored only online is not supported.
     

If you have never installed Office 2011 and are installing Office 2016 through an Office 365 Business edition subscription:

Microsoft does not currently provide a link in Office 365 to download a previous version of Office. It is still possible to insert EndNote temporary citations into a Word document, then save a copy of that document as a Rich Text Format (RTF) document, and use EndNote’s Tools>Format Paper command to create a second paper with formatted citations and bibliography. Please see this article for instructions on using Format Paper.

3. EndNote online: Unicode Support

EndNote online is designed to display and format Unicode characters in most languages. Some known limitations currently exist with importing, searching, and sorting for Chinese, Japanese, and Korean characters; see below for specifics. We will continue to improve Unicode support in future releases.

  • Searching an EndNote online library using the Cite-While-You-Write Find Citation(s) command in Microsoft Word fails when searching for Japanese characters.
  • Quick Search does not support left-hand truncation.
  • Quick Search requires an asterisk following single character searches for Chinese, Japanese, or Korean characters.
  • Quick Search fails to consistently find references when using one or two Chinese, Japanese, or Korean characters and an asterisk if the phrase is less than three characters.
  • Quick Search fails to find Chinese, Japanese, or Korean phrases in double quotes if the complete phrase is less than three characters.
  • Online Search of Z39.50 resources fails when searching for Chinese, Japanese, or Korean characters.
  • Format Paper does not support Unicode.
  • Importing text that includes Chinese, Japanese, or Korean author names may add an extraneous comma to the end of the author name.
  • EndNote Web account registration does not recognize an email address that includes Chinese, Japanese, or Korean characters.
  • Formatted HTML files use UTF-8 encoding. Shift JIS encoding is not supported at this time.
  • Sorting is based on Unicode sort. Localized language sort are not supported at this time.
4. EndNote CWYW and collaboration in Office 365, SharePoint and Google Docs best practice

Please also see: s EndNote X8, X9 or EndNote 20 CWYW compatible with MS Office 365 / MS Word 365?

This issue describes how to safely share Microsoft Word documents you may create using EndNote (Online) when you are not on the same local area network, e.g. Office 365, SharePoint and Google Docs. (If you are on the same local area network, you can just keep the Word document in a shared folder.)

Converting a Word document with formatted EndNote (Online) citations in it to another word-processing format will corrupt the EndNote (Online) citations. This means if you are going to use Google Docs, as an example, you will need to unformat the citations ('Convert to Unformatted Citations' via EndNote menu in MS Word) before converting the document to Google Docs format and then either convert it back to Word format before formatting the citations or save it as a rich text format document and use the Format Paper command in EndNote to create a second document with formatted citations and bibliography.

If you leave the unformatted citations (e.g., {Doe, 2015 #2354} ) in the Word document, you can use a cloud service such as a Dropbox, Sharepoint, or OneDrive (formerly SkyDrive) with a shared folder to allow multiple people to work on the same document instead of emailing the document in all its versions around. With these services you can just open the file in Word, work on it, then close it and save it back to the same location.

However, Word files saved in the .docx file format can also be used with the Microsoft Web apps (Office 365 and SharePoint) in a browser, even with formatted EndNote citations, if handled with the proper care. This can be useful if you need to make minor edits on the run, or if you want to have a group of people looking at the same document from different locations while editing. Because OneDrive and Office 365 are making use of the Microsoft Web apps more popular, I would like to show an example of how to safely use them with EndNote.

Below is an example of what a Word document with formatted EndNote citations would look like when viewed in editing mode in the Web version of Word. Notice that all of the EndNote citations and the bibliography appear shaded (grey). So long as nothing inside the shaded citations is changed, the document can be safely edited in the Web application. The shaded field contains of hidden XML data of the EndNote reference which can be made visible with ALT-F9 (hidden with ALT-F9 again). Cite While You Write cannot be used in the Web app, so a user would need to open document in the desktop version of Word to edit the citations or change the bibliography style, but edits to the text can be done in this web mode. When the document is closed the EndNote codes will remain intact because the document is saved and worked with in the native Microsoft Word file format; it is not being converted to another format in order to be worked with it on the Web.


If you prefer to work with 'Unformatted citations' from the start of a new document, you may disable instant formatting via the 'Instant formatting is off' dropdown menu in MS Word. If you would like to convert existing formatted citations to unformatted citations then choose Convert to Unformatted Citations from the EndNote X7 tab in MS Word 'Convert Citations and Bibliography-Convert to Unformatted Citations’.

5. EndNote Desktop, Online and iPad® - Sharing libraries

There are many ways to share an EndNote Library or 'groups'. The below procedure describes different ways to share an EndNote library. Please also see EndNote - Sharing libraries, or the detailed description of 'Classic' network sharing (FAQ item 10).

Each EndNote library consists of two items:

  1. An .enl file (e.g., MyLibrary.enl)
  2. An .Data folder (e.g., MyLibrary.Data)

The .Data folder consists of the (PDF) attachments and the database files and subfolders.

A compressed library consists of one .enlx file (e.g., MyLibrary.enlx, compare with .docx, .xlsx, .pptx). The .enlx file is in fact a zip-file. You can create a compressed library via EndNote menu 'File-Compressed Library'. It is optional whether you would like to include file attachments or not. The .enlx file is primarily for transfer and backup purposes (email, usb stick, backup).

Together with your EndNote Desktop license you are entitled to create an EndNote Online account. This account consists of your email address and a password. With this EndNote Online account you will be able to 'Sync' one of your libraries (your 'master' library) to the EndNote Online environment and to your EndNote for iPad.

Best practice to setup your EndNote Online account

This way your EndNote Desktop license will be correctly 'connected' with your EndNote Online account.

  1. Decide which of your possible multiple libraries will be your 'master library' which you would like to Sync to your EndNote Online or to your EndNote for iPad.
  2. Open the 'master library' in EndNote 21 desktop.
  3. Create a 'compressed library backup via 'File > Compressed library'. This feature will create a 'zip' file of your EndNote library (extension will be .enlx). Put this .enlx file in a backup folder. This is for safety reasons. If needed you will be able to restore your library from this .enlx file, just by opening this file with your EndNote desktop.
  4. To create your EndNote Online account;
    • For Windows;
      Go to 'Edit - Preferences - Sync'.
    • For Mac;
      Go to 'EndNote 21 menu - Preferences - Sync'.
  5. Click 'Enable Sync'.
  6. Click 'Sign up'  and enter your email address and click 'Submit'.
  7. Enter additional information and enter a password.
  8. Do not check 'Automatically Sync' yet untill you are familiar with the Sync feature.

Perform your first sync manually via 'Library > Sync'. Go to https://www.myendnoteweb.com and login with your EndNote Online account credentials to see the Online (synced)  version of your library.
Download and install your EndNote for iPad version from the Apple App store and enter your EndNote Online credentals to Sync your library to your iPad.
If you have ever synced another library in the past, the system will warn you that the library you are trying to Sync is different than the one used before. Please do not proceed before making a decent backup of your current 'master' library.

There are four different options to share your library.

A. Share your 'master' 'Sync' assigned library accross your own devices (EndNote desktop, Online, iPad). 
     Please see above.

B. Share your 'master' and 'Sync' assigned library with 1000 other colleagues.

  1. Your colleagues should create an EndNote Online account first. See above 'EndNote Desktop, Online and iPad®' or via https://www.myendnoteweb.com.
  2. After you have setup your own EndNote Online account and you have assigned your 'master' library for syncing and you have synced once (f.i. via 'Library > Sync'), you may share this specific library via 'File > Share'.
  3. Enter the email address (EndNote Online account) of your colleague and click 'Invite'.
  4. Your colleague will receive an email and will need to confirm and login once with his/her EndNote Online account.
  5. After confirming and loging in, your colleague opens the 'shared' library via 'File > Open Shared Library'. Your colleagues will have 'read-write' access to the library you shared with them.
  6. You may unshare anyone from sharing via the 'File > Share' screen.
  7. On their turn, your colleagues will be able to setup their own 'master' sync library and share their own library with other colleagues.

A detailed description can be found here on our web site.

C. Share a reference 'group' with other EndNote Online accounts.

  1. Go to https://www.myendnoteweb.com
  2. Login.
  3. Go to 'Organize > Manage my groups'.
  4. Check 'Share' right behind the 'Group' you would like to share.
  5. Click 'Manage sharing' and 'Start sharing this group'.
  6. Enter your colleague's EndNote Online account email address.
  7. Choose 'Read only' or 'Read & Write'.
  8. Click 'Apply'.
  9. Your colleagues will get notified and need to confirm by loging in.

Please mind: Attachments of references will not be shared if you use 'Group sharing via EndNote Online'.

Important: Once your colleagues get groups shared they will need to login to the EndNote Online environment and check the following settings:

 'Organize > Other's Groups':

  1. Show
  2. Use for Cite While You Write

D. Classic 'file' sharing via the network via a shared folder. 
     Please see the detailed instructions on our web site FAQ pages.


6. Is EndNote X9, 20 or EndNote 21 CWYW compatible with MS Office 365 / MS Word 365?

Please also see EndNote Windows or Mac, Cite While You Write CWYW tools missing or disabled in MS Word.

Yes, EndNote X9, 20 and EndNote 21 Cite While You Write (CWYW) both are compatible with Office 365 or MS Word 365. Office 365 is a subscription plan for the cloud/Online application. This subscription allows you to download MS Office 2019 or MS Word 2019 (or lower version). Login to your Office 365 account and download the Office 2019 (or lower version) and install it. Make sure you also have the latest patches and updates. After you have installed Office 2019 follow either of these two paths:

If you haven't installed EndNote X9, 20 or EndNote 21. Start the setup and install. Update to the latest version (Windows: Help > Check for Updates / Mac: EndNote > Check for Updates).

If you already have installed EndNote X9, 20 or EndNote 21 before installing Office 2019 (or lower version), just run 'Configure EndNote' (Windows) or 'EndNote customizer' (Mac).

Always close all MS Office applications (MS Word, Outlook, Excel etc.)

Windows

  1. Browse to the EndNote Program Files folder:

    64-bit Machines: C:\Program Files (x86)\EndNote X9\
                                  C:\Program Files (x86)\EndNote 20\
                                  C:\Program Files (x86)\EndNote 21\
    32-bit Machines: C:\Program Files\EndNote X9\
                                  C:\Program Files\EndNote 20\
                                  C:\Program Files\EndNote 21\ 
  2. Run the 'Configure EndNote.exe' utility.
  3. Make sure 'Configure EndNote components' is selected and click Next.
  4. Select Cite While You Write add-in for Microsoft Office and click Next.
  5. Click Finish.


Mac

  1. Click the EndNote menu and select 'Customizer'.
  2. Check the box in front of the 'Cite While You Write' option.
  3. Click next until the Customizer is finished. Open a library.


7. EndNote Windows or Mac, Cite While You Write CWYW tools missing or disabled in MS Word

EndNote Windows or Mac, Cite While You Write CWYW tools missing or disabled in MS Word

If you have installed EndNote X7.5 or higher, EndNote X8, EndNote X9, EndNote 20 or EndNote 21 and the Cite While You Write (CWYW) toolbar does not appear in MS Word or the CWYW tools do not function as expected, please follow the following instructions:

If you have EndNote X7, update EndNote to version X7.7.1 (latest X7 version).  Update to the latest version (Windows: Help > Check for Updates / Mac: EndNote > Check for Updates). You will need EndNote version X7.5 or higher, EndNote X8, EndNote X9, EndNote 20 or EndNote version 21.
To see which version you have on Windows choose 'Help > About EndNote' and on Mac 'EndNote > About EndNote'.

The same applies for MS Word. Update your MS Word to the latest updated version.

If the CWYW tools do not work or the EndNote X7, X8, X9, 20 or 21 CWYW toolbar/ribbon does not appear:

Please follow the Windows or the Mac troubleshooting items:

Windows

Check 1

  1. MS Word: Click on the File ribbon and select 'Options'.
  2. Click on 'Add-ins'.
  3. Change the 'Manage' options to 'Disabled Items' (bottom of the screen).
  4. Click Go.
  5. Highlight any EndNote item(s) and click 'Enable'.
  6. Click OK.

Try the CWYW tools again.


Check 2

  1. Close MS Word and browse to the EndNote Program Files folder:

    64-bit Machines: C:\Program Files (x86)\EndNote X7\
                               C:\Program Files (x86)\EndNote X8\
                               C:\Program Files (x86)\EndNote X9\
                               C:\Program Files (x86)\EndNote 20\
                               C:\Program Files (x86)\EndNote 21\
    32-bit Machines: C:\Program Files\EndNote X7\
                               C:\Program Files\EndNote X8\
                               C:\Program Files\EndNote X9\
                               C:\Program Files\EndNote 20\
                               C:\Program Files\EndNote 21\
     
  2. Run the 'Configure EndNote.exe' utility.
  3. Make sure 'Configure EndNote components' is selected and click Next.
  4. Select Cite While You Write add-in for Microsoft Office and click Next.
  5. Click Finish.
    Note: The message may read that the Configuration was cancelled.
  6. Open Microsoft Word and look for the EndNote X7,the EndNote X8, the EndNote X9, the EndNote 20 or EndNote 21 tools in the ribbon.


Check 3

I'm using MS Office (Word) 365 (2010, 2016, 2019, 2021) and the Cite While You write (CWYW) add-in is installed correctly and visible in MS Word. We have a network and are using Citrix (App-V) or another terminal client server environment. However, when I try to insert a citation into my MS Word document, it takes a moment, nothing happens and there is an error popup screen saying 'Server execution failed'. Starting MS Word via 'Run as administrator' solves the problem and citations can be inserted and bibliography generated without problems. However, I'm not an administrator buit a regular user.

  1. Ask your IT or EndNote software/application administrator Add 'C:\Program Files (x86)\Common Files\ResearchSoft\Cwyw\' including 'sub folders' (check box) to trusted locations in MS Word: MS Word > File > Options > Trust Center > Trust Center Settings > Trusted Locations
  2. Make sure the policy is applied by your IT or EndNote software/application administrator organization wide (for EndNote and MS Word CWYW users).
  3. Start MS Word and try the CWYW tools in MS Word again. Now it should work both for regular users as for administrators.


Check 4

I'm using MS Office (Word) 365 and the Cite While You write (CWYW) add-in is installed correctly and visible in MS Word. However, when I try to insert a citation into my MS Word document, it takes a moment, nothing happens and there is an error popup screen saying 'Server execution failed'.

  1. This means the local components of your MS Office (MS Word etc.) are not installed yet. Please go to portal.office.com or to www.office.com.
  2. If you aren't logged in already, please login with your Microsoft Office email address and password.
  3. Click the 'Install Office' button.
  4. Once the installation of the local components has been finalized, try the CWYW tools in MS Word again.


Check 5

After installing the EndNote X7, the EndNote X8, the EndNote X9, the EndNote 20 or the EndNote 21 Cite While You Write (CWYW) toolbar/ribbon was available in MS Word, however after restaring MS Word it has disappeared. EndNote X7, EndNote X8, EndNote X9, EndNote 20 or EndNote 21 is not visible or active.

  1. Start MS Word as ‘Administrator’:
      Start > Run > RIGHT mouse click MS Word > More > Run as administrator
  2. Go to: File > Options > Add-ins
  3. Choose ‘Com Add ins’ and click ‘Go’.
  4. Check ‘EndNote Cite While You Write’ and click ‘Remove’.
  5. Close MS Word.
  6. Start MS Word again as ‘Administrator’:
      Start > Run > RIGHT mouse click MS Word > More > Run as administrator
  7. Go to: File > Options > Add-ins
  8. Choose ‘Com Add ins’ and click ‘Go’.
  9. Click ‘Add’.
  10. Browse to folder:
     
      EndNote 21: C:\Program Files (x86)\Common Files\ResearchSoft\Cwyw\21\
     
      EndNote 20: C:\Program Files (x86)\Common Files\ResearchSoft\Cwyw\20\
     
      EndNote X9: C:\Program Files (x86)\Common Files\ResearchSoft\Cwyw\19\
     
      EndNote X8: C:\Program Files (x86)\Common Files\ResearchSoft\Cwyw\18\
     
      EndNote X7: C:\Program Files (x86)\Common Files\ResearchSoft\Cwyw\17\
     
  11. Select/Click ‘EndNote Cwyw.dll’

    If this file isn't available please follow up 'Check 2' Windows (above) first.
     
  12. Click ‘Ok’.
  13. Close MS Word.
  14. Start MS Word as normal.
  15. Now the EndNote toolbar should be available.


Check 6

  1. Browse to 'C:\Users\[USERNAME]\AppData\Roaming\Microsoft\Templates\Normal.dotm'. Rename the 'Normal.dotm' to 'Normal.dotm_bak'. MS Word will re-create the file when restarted.
  2. Start MS Word


Check 7

With Word 2010/2013/2016/2019,2021 the Ribbon tab may also be unchecked.

  1. Click on the File menu and select Options.
  2. Click on Customize Ribbon and Check EndNote if it is unchecked.
  3. Click OK to display the EndNote tab in the Word Ribbon.


Check 8

If the option to 'Disable all Application Add-ins' is checked in MS Word, that can also cause the tools to not appear. To turn off this setting, do the following:

  1. MS Word: Click on the File ribbon and select 'Options'.
  2. Click on 'Trust Center'.
  3. Click 'Trust Center Settings'.
  4. Click 'Add-ins'.
  5. Uncheck 'Disable all Application Add-ins (may impair functionality)' and click OK.
  6. Click OK.
  7. Exit Word and then re-open it.


Mac

Check 1

  1. EndNote 21 (20, X9, X8 or X7.7.1): Start EndNote 21 (20, X9, X8 or X7.7.1).
  2. Open Word. In Word, click on the Word menu and select About Word. Make sure this reads at least version 15.23. If you do not have this version click on the Help menu and select Check for Updates. Follow the steps to update Word.

    EndNote 21 (20, X9, X8 or X7.7.1): Close Word and go to EndNote.
     
  3. Click the EndNote menu and select 'Customizer'.
  4. Check the box in front of the 'Cite While You Write' option.
  5. Click next until the Customizer is finished. Open a library.
  6. Then open MS Word and check the Ribbon for the EndNote tab.  (NOTE: The EndNote CWYW tools no longer appear under the Tools menu; rather appears as a separate tab in Word).


Check 2

Check your Mac OS security settings.
Mac OS Mojave and higher versions (macOS Mojave 10.14.6, macOS Catalina 10.15.7, macOS Big Sur 11.7, macOS Monterey 12.6) include new Security & Privacy functions which can prevent EndNote (CWYW Cite While You Write) from being able to correctly automate.

The error with normal visible and available EndNote 21 CWYW seen is: This version of the EndNote application is not compatible with Cite While You Write. The copy of EndNote currently running is located at: "/Applications/EndNote 21/EndNote 21.app

EndNote 20 macOS Mojave Catalina Big Sur Monterey EndNote CWYW

To correctly set these options:


  1. Close MS Word and EndNote.
  2. Go into the Apple menu.
  3. Click System Preferences.
  4. Click Security & Privacy.
  5. Click the Privacy tab (along the top).
  6. Click the Automation options, along the left.
  7. Here, make sure that both "Microsoft Word" and "EndNote X#" are both turned on.
  8. With this automation turned off, the EndNote CWYW Cite While You Write functions will not work in MS Word.


Check 3

I'm using MS Office (Word) 365 and the Cite While You write (CWYW) add-in is installed correctly and visible in MS Word. However, when I try to insert a citation into my MS Word document, it takes a moment, nothing happens and there is an error popup screen saying 'Server execution failed'.

  1. This means the local components of your MS Office (MS Word etc.) are not installed yet. Please go to portal.office.com or to www.office.com.
  2. If you aren't logged in already, please login with your Microsoft Office email address and password.
  3. Click the 'Install Office' button.
  4. Once the installation of the local components has been finalized, try the CWYW tools in MS Word again.


Check 4

  1. Close Word and EndNote.
  2. Open your hard drive and go to the following folder:

    EndNote 21: Applications: EndNote 21: Cite While You Write

    EndNote 20: Applications: EndNote 20: Cite While You Write

    EndNote X9: Applications: EndNote X9: Cite While You Write

    EndNote X8: Applications: EndNote X8: Cite While You Write
    or
    EndNote X7: Applications: EndNote X7: Cite While You Write
     
  3. Copy the file 'EndNote CWYW Word 201X.bundle' by highlighting the file and going to 'Edit > Copy'.
  4. Go to the folder '[Hard Drive Name] : Library : Application Support : Microsoft : Office365 : User Content : Startup : Word' and paste the file, 'Edit > Paste'.

    Note: If you have trouble finding the above location you need to click on Finder (in the Dock the icon of a face) to the right of Finder click on the Go menu then click on Computer then click on the Macintosh Hard Drive. You should then be able to follow the path above.
    Note: In non-English versions of Word, the folder named 'Startup' may be called 'Start' or be in the localized language of Word.
     
  5. Start Word, go to 'Word > Preferences' and click on 'File Locations'.
  6. If the Startup folder is set to any location, highlight 'Startup' (see above note at item 3) and click on 'Reset'.
  7. Click 'OK' and Quit Word.
  8. Start EndNote and then start Word

    Regarding step 3:

    NOTE: If you do not see the "EndNote CWYW Word 201X.bundle" file in the "Applications: EndNote 21: Cite While You Write" folder (or if this file is not the most up to date version), you can follow these steps: 
    Download a copy of the latest EndNote online tools here. Run this file and follow the steps to install the tools in Word.

EndNote CWYW Bundle OS X Sierra 10.12 MS Word


8. When inserting a citation from EndNote 20 or 21 I get the error: 'Cannot edit range'

The exact error message:

Windows: Cannot edit Range

Mac: A COM exception occurred. Cannot edit Range.

The Mendeley Word add-in is causing this conflict. Unchecking or remove the addin is not possible.

For Windows

First make sure the 'hidden files and folders' are visible (Menu View > Options) in Windows.

  1. Find the correct path via MS Word 'File > Options > Addins> Word or Com addins'.
  2. Then look for the path of the Mendeley add-in (e.g. Mendeley-word2016-1.18.dotm or Mendeley-word2016-1.19.dotm) in the same screen. Usually the path is: C:\Users\[User Name]\AppData\Roaming\Microsoft\Word\STARTUP.
  3. Close MS Word and go via Windows Explorer to the above path.
  4. Remove the Mendeley Word add-in.
  5. Start MS Word and the problem should be solved.

Alternatively, uninstall Mendeley (and the add-in with it). EndNote has many PDF file and folder import, PDF-handling and Find Full-text options.

For Mac

  1. Usually the path is:  /Users/[User Name]/Library/Group Containers/UBF8T346G9.Office/User Content.localized/Startup.localized/Word
  2. Close MS Word and go to the above path. To see this (hidden) folder, please use the Finder and Go and hold down the [OPTION] (ALT) button and click the appearing 'Library' item.
  3. Remove the Mendeley Word add-in (e.g. Mendeley-word2016-1.18.dotm or Mendeley-word2016-1.19.dotm).
  4. Start MS Word and the error should be solved.

Alternatively, uninstall Mendeley (and the add-in with it). EndNote has many PDF file and folder import, PDF-handling and Find Full-text options.

A similar behaviour may be seen with other third party add-ins e.g., like Zotero. Please follow a similar approach to disable (uncheck) or uninstall other third party add-ins. Clicking the third party plugin, will show the exact path to the add-in/plugin file(s).


9. EndNote installation hangs or stops at approximately 90%

Due to some anti-virus software (false possitive) the EndNote installation hangs or stops at approximately 90% of the setup and the installer resets the setup. This occurs at the point of the setup where the Direct/Web Export Helper is installed.

To solve this issue, rerun the EndNote setup in custom mode.

  1. Rerun the setup.
  2. In the 'Select Installation Type' screen select 'Custom' instead of the default 'Typical'.

    EndNote X8 Custom Setup
     
  3. In the 'Select Features' screen uncheck the 'Install Direct Export Helper' item. If you planned to install all Connection files, all Import filters and all Output Styles instead of the most popular items, choose 'Entire feature will be installed on local hard drive' at the items shown with a red cross icon.

    EndNote X8 Custom Setup - Uncheck Install Direct Export Helper
     
  4. Continue with 'Next' and finalize the setup.

For EndNote version X7 and X8 users: The 'Direct/Web Export Helper' can be downloaded and manually installed by clicking this link.


10. EndNote Mac CWYW tools seem not to be working in MS Word for Mac (automation turned off)

EndNote Mac CWYW tools seem not to be working in MS Word for Mac (automation turned off)

When attempting to insert a citation via the Cite While You Write (CWYW) tools into MS Word for Mac under macOS 10.14 Mojave, the user is returned to the library window and the citation seems not be formatted automatically. Instead nothing seems to happen or an error is thrown.

MacOS 10.14 Mojave includes new 'Security & Privacy' functions which can prevent EndNote from being able to correctly automate. To correctly set these options please follow the instructions below:


  1. Go into the Apple menu (left top Apple logo).
  2. Click 'System Preferences'.
  3. Click 'Security & Privacy'.
  4. Click the 'Privacy' tab (top)
  5. Click the 'Automation' options (left).
  6. make sure that both "Microsoft Word" and "EndNote X#" are both checked (turned on).


IMPORTANT: Even if the above items are on (checked), please uncheck them and close the screen and re-open the same screen once again and check the items. Then the 'preferences' will be saved correctly.

If the above 'automation' settings are off, the Cite While You Write (CWYW) functions will not work.

Additional check

In MS Word for Mac > Tools > Templates and Add-ins, please verify the existence of third party add-ins or plugins. These third party add-ins might be conflicting with or disabling the EndNote CWYW add-in. Uncheck the third party plugins to see if it helps to solve the problem. If unchecking helps, you might want to uninstall the plugins. Clicking the third party plugin, will show the exact path to the add-in/plugin files.


11. Apple macOS 10.15 Catalina and EndNote X9.3.2 for Mac update and database conversion

Apple has released macOS 10.15 Catalina. Apple has made the decision to drop all 32-bit application support with this release, which will impact EndNote. Therefore, EndNote X9.3.0 and higher for macOS 10.15 Catalina has been released.

November 20, 2019-- EndNote X9.3.2 is now available for Mac

The EndNote X9.3.2 Mac (Bld: 15235) update contains:

  • Compatible with macOS Catalina
  • New database engine to comply with Apple’s 64-bit compatibility requirements
    NOTE: When you open an existing library in X9.3 and later for Mac, it will create a converted version for use with this new database engine. The original library will not be changed, so you can continue using it X9.2 or earlier. Alternatively, use Sync to move your data across systems and versions.
  • Dark Mode support
  • Unicode support updated and modernized
  • Other improvements and bug fixes
  • Resolved an issue with the software updater (fixed in X9.3.1)
  • Resolved issues converting certain libraries from previous versions (fixed in X9.3.2)
  • Corrected issue with the Insert Citation window occasionally appearing blank in Microsoft Word 2019/365 (fixed in X9.3.2)
  • Resolved stability issues with Microsoft Word 2008/2011 (fixed in X9.3.2)


Automatically Update and alternative update options

If you obtain a new full license, you most probably have received the newest version. Setting up the EndNote application should be quite straight forward and easy. If you already have a single user, multi user or Site license EndNote X9.x for Mac, than follow the instructions below.

There are different ways to update an existing EndNote X9.x for Mac version to EndNote X9.3.2 for Mac.

  • In EndNote X9, under the 'EndNote X9' menu, choose 'Check for Updates…'. Follow the instructions to automatically get updated.
  • If the above does not work, alternatively, download from your original (single user, multi user, site license) download location the 'EndNoteX932UpdateInstaller.zip' and run the file.
  • If the above both do not work, download from your original (single user, multi user, site license) download location the FULL DOWNLOAD FILE which should be the latest version (e.g., EndNote X9.3.2 for Mac). Please backup your 'Applications\EndNote X9' folder, your libraries and your MS Word documents/manuscripts (always necessary to have backups). Then move your 'Applications\EndNote X9' folder to the recycle bin. Run the installer via the FULL EndNote X9 DOWNLOAD FILE.

After the update or (re)new installation, check 'EndNote X9 > About EndNote' and it should say version X9.3.2 and build 15235.

The first time you open an existing library, EndNote will ask you to convert the library. It will keep the original older version library files and convert the library under a different name. Keep the older version formatted files untill you are satisfied with the newest version libraries.


12. Steps to follow as a precaution and preparation to the EndNote X9.3.x conversion

As you may be aware, Apple has released macOS 10.15 Catalina. Apple has made the decision to drop all 32-bit application support with this release, which impacted EndNote X9 for Mac and in the end also EndNote X9 for Windows. You can read more at Apple’s knowledge base article here: https://support.apple.com/en-us/HT208436.

Starting with EndNote X9.3.x if you open a library EndNote will ask you to convert your library to the new X9.3.x format. Although the existing library .enl file and .Data folder (e.g., MyLibrary.enl and MyLibrary.Data) will not be touched (available for EndNote X9.2 or earlier versions or as a backup), it is wise to prepare for the conversion to avoid any conversion hiccups BEFORE UPDATING OR UPGRADING YOUR ENDNOTE TO VERSION X9.3.X.

Here are some recommended pre-conversion steps:
The following steps can be repeated for several libraries if you have multiple libraries. If you haven't uninstalled EndNote version X9.2 or X8.x or X7.x, you always launch your older version from the application (apps) folder EndNote X9 or X8 or X7 (Mac) or for Windows from e.g. from 'C:\Program Files (x86)\EndNote X9\EndNote.exe' or 'C:\Program Files (x86)\EndNote X8\EndNote.exe' or 'C:\Program Files (x86)\EndNote X7\EndNote.exe'. Using the older version you may do the preparation / cleanup steps if the immediate conversion somehow fails.

Since a lot of people are working from thier homes, remotely via VPN and Wifi etc. one need to realize that the data transfer rates over the diverse connections might be less fast. If any of the conversion or recovery options is being applied on the libraries, please consider to place the library files and folders closer to the 'machine' you're working on. If you are connecting via VPN to your job network and the libraries are always stored in your home folder on the network, the most close place could be the local C or D or USB disk of your notebook, then the local notebook or pc at your work and then the network of your work. It is also not recommended to store your libraries in the cloud. Each library consists of two items, an .enl file and a .Data folder. If your library name is 'Diego-Maradona', then your library items are 'Diego-Maradona.enl' (file) AND 'Diego-Maradona.Data' (folder). One needs both to move, copy and paste or to recovery/rebuild or to convert to the new format.

  1. Backup your library or libraries via Endote or manually first. Please see How can I (manually) backup my library?.
  2. Start EndNote X9.2 or earlier version e.g. like X8.
  3. Open the library (e.g. MyLibrary) that needs to be converted.
  4. Go to 'Edit (Windows) or EndNote (Mac) > Preferences > PDF Handling'
    Please choose for example 'Author-Year' (or something else which suit your needs). This is to avoid that the PDF attachments get too long names (> 255 characters) or strange names e.g. like '13-%2056&$@8C%29_F%28T%29_PF1%28PRP%29_PFA%.pdf'.
  5. Apply and exit this screen.
  6. Select all your references/records (CTRL A) followed by 'References > File Attachments > Rename PDFs'
    Please choose for example Author-Year (or something else which suit your needs).
  7. Select all records (CTRL A) followed by 'Tools > Find Broken Attachment Links'
    Remove the 'orphan' (PDF or other type) attachments and add the right attachment(s).
  8. Go to 'Tools > Define Term Lists', choose 'Journals' and choose 'Import'.
    Import the right Journal Name synonyms for your research area (e.g., Medical): Long names, Short names, Short names with periods and Custom names. This will avoid wrong entry and import of the Journal Name synonyms. More information about Term Lists is available in our EndNote Practical Guide.
  9. Check the content of the Trash and empty the Trash.
  10. Alternatively, do the following 'References > File Attachments > Convert to Relative Links'. This will make sure the PDF's are stored in the subfolder PDF in the .Data folder of the library.


Now we are ready to a recovery of your library (e.g. MyLibrary) to prepare it for the conversion to EndNote X9.3.x or higher format.

  1. Backup your library or libraries via Endote or manually first. Please see How can I (manually) backup my library?.
  2. Start EndNote X9.2 or earlier version e.g. like X8.
  3. Close the library via 'File > Close Library'.
  4. Go to 'Tools > Recover Library'.
  5. Browse to your Library .enl file (e.g. MyLibrary.enl). Select it and click 'Open'.
  6. Now EndNote will prompt for a new name for your recovered library and it will propose (default) e.g. 'MyLibrary-Saved.enl'.
  7. Click 'Save'. Now a recovered copy of your library (e.g. MyLibrary-Saved) will be saved in the same folder as your 'old' library was. There will be an .enl file (e.g. 'MyLibrary-Saved.enl') and a .Data folder e.g. ('MyLibrary-Saved.Data').
  8. The latter recovered version of your library will be used to to perform the conversion steps in EndNote X9.3.x or higher.


If you have an EndNote Online account and are syncing with your EndNote Online account environment [check here Edit (Windows) or EndNote (Mac) > Preferences > Sync], then it would be an excellent moment to check if your local desktop library is in sync with your Online library. Go to https://www.myendnoteweb.com, login with your EndNote Online account email address and password. Compare the number of references and the groups with the number of references and your groups in your local 'recovered' library (e.g. MyLibrary-Saved). If that's the case, we are ready to continue upgrading or updating to EndNote X9.3.x and do the conversion.

  1. If your organization has a Site/Campus License or a Multi-user license for EndNote, your IT colleagues will have received instructions how to download the latest EndNote X9.3.x files and probably they will instruct you accordingly. If you are a stand alone user or if your IT has allowed you to install updates, you would want to follow the update routine available in EndNote. Start EndNote and go to 'Help (Windows) or EndNote (Mac) > Check for Updates' to initiate the update to version X9.3.x. If you are still on version X7 or X8, write down your serial number ('Help (Windows) or EndNote X9 (Mac) > About EndNote) and please upgrade to EndNote X9. If your EndNote is EndNote X6 or older please buy the full EndNote X9.
  2. Follow the on screen instructions to setup EndNote X9.3.3 (current latest edition as of May 2020).
  3. Start EndNote X9.3.3
  4. If you have enabled 'Sync' with EndNote Online, please disable 'Sync Automatically' in the Sync screen (Edit (Windows) or EndNote (Mac) > Preferences > Sync) untill all works as expected after the conversion.
  5. Depending on your settings it will prompt you to select a library or open the last used library. Please browse to your prepared and 'recovered library' (e.g. MyLibrary-Saved) and select it. EndNote X9.3.3 will recognize an 'old' library format and prompt you to do allow the conversion. Here you will see a prompt screen:

    EndNote X9.3.3 Conversion
     
  6. Click 'Ok' and EndNote will propose a new, default with OldName-Converted (e.g MyLibrary-Saved-Converted.enl). You may adjust it as long as the new name isn't equal to the old name.
  7. EndNote will convert the library and save it in the same folder (e.g., MyLibrary-Saved-Converted.enl and MyLibrary-Saved-Converted.Data) as the 'old' library. The existing 'old' library .enl file and .Data folder (e.g., MyLibrary-Saved.enl and MyLibrary-Saved.Data) will not be touched (available for EndNote X9.2 or earlier versions or as a backup).
  8. From now on, you may use the new converted library (e.g., MyLibrary-Saved-Converted.enl and MyLibrary-Saved-Converted.Data). Please remember that you may rename the library if needed, as long as the library name is not exactly the same as the 'old' version library.
  9. The conversion and renaming should have no implications for the 'Sync' and 'Share' processes via (your) EndNote Online (account).
  10. If all runs wel and syncs as expected you may enable 'Sync Automatically' (Edit (Windows) or EndNote (Mac) > Preferences > Sync).


13. EndNote X7.5 through X7.7.1, EndNote X8 and EndNote X9 for Windows or Mac: Cite While You Write (CWYW) tools are disabled or missing in MS Word 2016 (MS Office 2016)

EndNote X8.2 is now available for Mac.

January 23, 2018-- The EndNote X8.2 Mac (Build: 18.2.0.13302) update contains:

  • EndNote X8.2 Mac Cite While You Write add-in compatibility for Microsoft Word 2016, version 16.x
  • EndNote X8.2 Mac compatibility with macOS High Sierra

The EndNote X8.2 Mac Cite While You Write tools will load in Word 2016 version 16.9 while the primary system language is set English or to something other than English. However, testing has revealed that MS Word 2016 will not load the add-in if the system language is set to Swedish, Turkish, Indonesian or Danish. This has been brought this to the attention of Microsoft for them to investigate the cause. The language is a per account setting: System Preferences > Language & Region > Add language > English (plus keyboard preferences). A reboot is required to set the System language for an account.

Important: The above CWYW issue with Swedish, Turkish, Indonesian or Danish has been resolved by an update from Microsoft: MS Word for Mac version 16.10 (build 180114)

If somehow the CWYW toolbar does not appear, close MS Word (and other MS Office applications) and run the EndNote Customizer via the menu 'EndNote > Customizer...'

Still using EndNote X6 or X7? Please buy the EndNote X8 Upgrade Download.

Important notice about MS Office 2016 / MS Word 2016 Insider program (slow and fast)

EndNote X7.7.1

Please keep running MS Office 2016/ MS Word 2016 version 15.x and avoid both the 'slow' and 'fast' MS Insider progam updates since updating your MS Word to version 16.9.x will create an incompatibility with EndNote X7.7.1 Cite While You Write (CWYW) functionality.

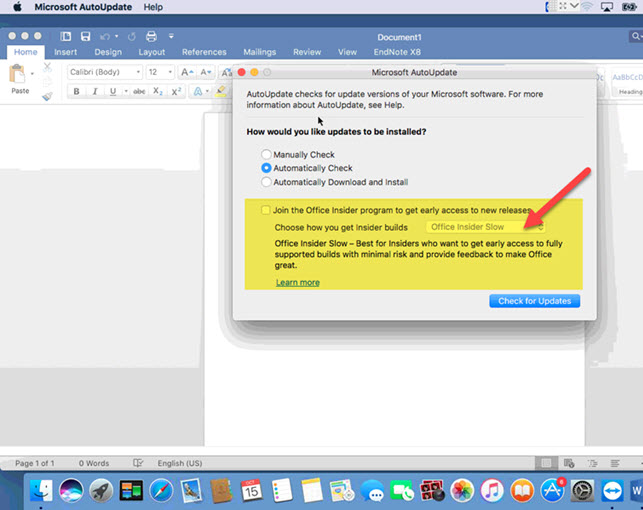
How to check whether you have joined the Microsoft Fast or Slow Insider Program: Go to MS Word menu > Help > Check for Updates. The bottom section of this screen will show you whether the MS Insider Program is selected (checked) or not.

If you have downloaded and installed MS Word version 16.9.x, please downgrade your MS Word to version 15.41.0.

Buy the EndNote X8 Upgrade Download

EndNote X8.1

Please keep running MS Office 2016/ MS Word 2016 version 15.x and avoid both the 'slow' and 'fast' MS Insider progam updates since updating your MS Word to version 16.9.x will create an incompatibility with EndNote X8.1 Cite While You Write (CWYW) functionality.

How to check whether you have joined the Microsoft Fast or Slow Insider Program: Go to MS Word menu > Help > Check for Updates. The bottom section of this screen will show you whether the MS Insider Program is selected (checked) or not.

If you have downloaded and installed MS Word version 16.9.x, please downgrade your MS Word to latest version 15.41.0 or join the EndNote X8 beta program: EndNote Beta Signup Fall 2017.

January 19, 2018  - The production version of EndNote X8.1 for Mac is currently not compatible with newest version of MS Word 16.9. The current public Beta was built specifically to address this compatibility issue. As an end-user, your current options are to wait until the week of January 22, 2018 when a compatible patch will be released or alternatively join the public Beta, or revert your version of MS Word 2016 to version 15.41 (see instructions below).

WARNING! Use these instructions at your own risk. Please consult your ICT colleague or the Publisher of MS Word (Microsoft) and make sure you have a backup of your important items and applications:

  1. Download the latest MS Word 2016 build version 15 here (which currently is 15.41.0 for retail versions and 15.37.0 for Volume licensees): https://support.office.com/en-us/article/Update-history-for-Office-2016-for-Mac-700cab62-0d67-4f23-947b-3686cb1a8eb7
    --> Word 15.41.0 (17120500) Update package OR Install package
  2. Start 'Finder' on your Mac. Confirm the download (step 1) is available in your Downloads folder.
  3. Click 'Applications'.
  4. Select and hold mouse click the 'Microsoft Word.app'.
  5. Put in the trash. Please do not empty the trash until you have confirmed 'Microsoft Word.app' version 15.41.0 is working. If the latter is not the case, you may restore your 'Microsoft Word.app' version 16.x from the trash.
  6. Run the downloaded PKG package (.pkg) and install version 15.41.x.
  7. Now your MS Word 2016 15.41 and EndNote's Cite While You Write should work as it was.


MS Word 2016 Mac Help Check for Updates


MS Word 2016 MS Insider Program


EndNote Beta Testing for X8 Mac

Help to test and troubleshoot a new version of Cite While You Write for the New Office Insider release of Office 2016 for Mac. Sign up below to beta test the latest version of EndNote X8.

First make sure that you answer yes to each of the following:

  • Are you a current X8 Mac user?
  • Do you have access to Word 2016 for Mac?
  • Did you receive the free service update for your Microsoft Word 2016 for Mac from Microsoft as part of their Office Insider program?
  • Do you have administrative rights to install software on your computer?

Please join the EndNote X8 beta program: EndNote Beta Signup Fall 2017.

EndNote X8 and macOS High Sierra (OS 10.13)
Through testing and reports from users, some issues, that existed with macOS Sierra have persisted with macOS High Sierra, have been discovered with the EndNote PDF viewer.

Selecting and highlighting text is misaligned (meaning the text that is highlighted is not where your cursor is). These issues have been reported by the EndNote Development Team to Apple. As a workaround, you can open up your PDFs to annotate in an external PDF application or use the annotation workflow in the free EndNote for iPad app. These same issues can be found in other Mac applications with similar PDF capabilities. As these are known issues to Apple, it is possible that Apple will release an update to Sierra and High Sierra that will include bug fixes for these issues, thus improving the PDF experience for X8 users without a release from EndNote.

The Publisher of EndNote will continue to work with Apple to resolve these issues for the current version of EndNote X8 Mac.

EndNote X7 and macOS High Sierra (OS 10.13)
Through testing and reports from users, some issues with the EndNote PDF viewer that existed with macOS Sierra have persisted with macOS High Sierra have been discovered.

Selecting and highlighting text is misaligned (meaning the text that is highlighted is not where your cursor is). These issues have been reported by the EndNote Development Team to Apple. As a workaround, you can open up your PDFs to annotate in an external PDF application or use the annotation workflow in the free EndNote for iPad app. These same issues can be found in other Mac applications with similar PDF capabilities.

A patch for EndNote X7 Mac is currently NOT planned.

Buy the EndNote X8 Upgrade Download

EndNote X6 and macOS High Sierra (OS 10.13)
EndNote X6 Mac is not officially compatible with macOS High Sierra. The Publisher of EndNote does not anticipate providing further compatibility updates to fix issues with EndNote X6 with macOS High Sierra.

Buy the EndNote X8 Full Download

EndNote X5 and earlier versions and macOS High Sierra (OS 10.13)
Due to major compatibility issues, it is not possible to use EndNote X5 Mac or earlier on macOS High Sierra.

Buy the EndNote X8 Full Download


EndNote X7.5 through X7.7.1, EndNote X8 and EndNote X9 for Windows or Mac: Cite While You Write (CWYW) tools are disabled or missing in MS Word 2016 (MS Office 2016)

If you have installed EndNote X7.5 or higher, EndNote X8 or EndNote X9 and the Cite While You Write (CWYW) toolbar does not appear in MS Word 2016 or the CWYW tools do not function as expected, please follow the following instructions:

If you have EndNote X7, update EndNote to version X7.7.1 (latest X7 version).  Update to the latest version (Windows: Help > Check for Updates / Mac: EndNote > Check for Updates). You will need EndNote version X7.5 or higher, EndNote X8 or EndNote version X9.
To see which version you have on Windows choose 'Help > About EndNote' and on Mac 'EndNote > About EndNote'.

The same applies for MS Word 2016. Update your MS Word 2016 to the latest updated version.

If the CWYW tools do not work or the EndNote X7, X8 or X9 CWYW toolbar/ribbon does not appear:

Please follow the Windows or the Mac troubleshooting items:

Windows

Check 1

  1. Word 2016: Click on the File ribbon and select 'Options'.
  2. Click on 'Add-ins'.
  3. Change the 'Manage' options to 'Disabled Items' (bottom of the screen).
  4. Click Go.
  5. Highlight any EndNote item(s) and click 'Enable'.
  6. Click OK.

Try the CWYW tools again.


Check 2

  1. Close MS Word and browse to the EndNote Program Files folder:

    64-bit Machines: C:\Program Files (x86)\EndNote X7\
                               C:\Program Files (x86)\EndNote X8\
                               C:\Program Files (x86)\EndNote X9\
    32-bit Machines: C:\Program Files\EndNote X7\
                               C:\Program Files\EndNote X8\
                               C:\Program Files\EndNote X9\
     
  2. Run the 'Configure EndNote.exe' utility.
  3. Make sure 'Configure EndNote components' is selected and click Next.
  4. Select Cite While You Write add-in for Microsoft Office and click Next.
  5. Click Finish.
    Note: The message may read that the Configuration was cancelled.
  6. Open Microsoft Word and look for the EndNote X7,the EndNote X8 or the EndNote X9 tools in the ribbon.


Check 3

I'm using MS Office (Word) 365 (2010, 2016, 2019) and the Cite While You write (CWYW) add-in is installed correctly and visible in MS Word. We have a network and are using Citrix (App-V) or another terminal client server environment. However, when I try to insert a citation into my MS Word document, it takes a moment, nothing happens and there is an error popup screen saying 'Server execution failed'. Starting MS Word via 'Run as administrator' solves the problem and citations can be inserted and bibliography generated without problems. However, I'm not an administrator buit a regular user.

  1. Ask your IT or EndNote software/application administrator Add 'C:\Program Files (x86)\Common Files\ResearchSoft\Cwyw\' including 'sub folders' (check box) to trusted locations in MS Word: MS Word > File > Options > Trust Center > Trust Center Settings > Trusted Locations
  2. Make sure the policy is applied by your IT or EndNote software/application administrator organization wide (for EndNote and MS Word CWYW users).
  3. Start MS Word and try the CWYW tools in MS Word again. Now it should work both for regular users as for administrators.


Check 4

I'm using MS Office (Word) 365 and the Cite While You write (CWYW) add-in is installed correctly and visible in MS Word. However, when I try to insert a citation into my MS Word document, it takes a moment, nothing happens and there is an error popup screen saying 'Server execution failed'.

  1. This means the local components of your MS Office (MS Word etc.) are not installed yet. Please go to portal.office.com or to www.office.com.
  2. If you aren't logged in already, please login with your Microsoft Office email address and password.
  3. Click the 'Install Office' button.
  4. Once the installation of the local components has been finalized, try the CWYW tools in MS Word again.


Check 5

After installing the EndNote X7, the EndNote X8 or the EndNote X9 Cite While You Write (CWYW) toolbar/ribbon was available in MS Word, however after restaring MS Word it has disappeared. EndNote X7, EndNote X8 or EndNote X9 is not visible or active.

  1. Start MS Word as ‘Administrator’:
      Start > Run > RIGHT mouse click MS Word 2016 > More > Run as administrator
  2. Go to: File > Options > Add-ins
  3. Choose ‘Com Add ins’ and click ‘Go’.
  4. Check ‘EndNote Cite While You Write’ and click ‘Remove’.
  5. Close MS Word.
  6. Start MS Word again as ‘Administrator’:
      Start > Run > RIGHT mouse click MS Word 2016 > More > Run as administrator
  7. Go to: File > Options > Add-ins
  8. Choose ‘Com Add ins’ and click ‘Go’.
  9. Click ‘Add’.
  10. Browse to folder:
     
      EndNote X9: C:\Program Files (x86)\Common Files\ResearchSoft\Cwyw\19\
     
      EndNote X8: C:\Program Files (x86)\Common Files\ResearchSoft\Cwyw\18\
     
      EndNote X7: C:\Program Files (x86)\Common Files\ResearchSoft\Cwyw\17\
     
  11. Select/Click ‘EndNote Cwyw.dll’

    If this file isn't available please follow up 'Check 2' Windows (above) first.
     
  12. Click ‘Ok’.
  13. Close MS Word.
  14. Start MS Word as normal.
  15. Now the EndNote toolbar should be available.


Check 6

  1. Browse to 'C:\Users\[USERNAME]\AppData\Roaming\Microsoft\Templates\Normal.dotm'. Rename the 'Normal.dotm' to 'Normal.dotm_bak'. MS Word will re-create the file when restarted.
  2. Start MS Word


Check 7

With Word 2010/2013/2016, the Ribbon tab may also be unchecked.

  1. Click on the File menu and select Options.
  2. Click on Customize Ribbon and Check EndNote if it is unchecked.
  3. Click OK to display the EndNote tab in the Word Ribbon.


Check 8

If the option to 'Disable all Application Add-ins' is checked in Word 2016, that can also cause the tools to not appear. To turn off this setting, do the following:

  1. MS Word 2016: Click on the File ribbon and select 'Options'.
  2. Click on 'Trust Center'.
  3. Click 'Trust Center Settings'.
  4. Click 'Add-ins'.
  5. Uncheck 'Disable all Application Add-ins (may impair functionality)' and click OK.
  6. Click OK.
  7. Exit Word and then re-open it.

Mac

Check 1

  1. EndNote X9 (X8 or X7.7.1): Start EndNote X9 (X8 or X7.7.1).
  2. Open Word. In Word, click on the Word menu and select About Word. Make sure this reads at least version 15.23. If you do not have this version click on the Help menu and select Check for Updates. Follow the steps to update Word.

    EndNote X9 (X8 or X7.7.1): Close Word and go to EndNote.
     
  3. Click the EndNote menu and select 'Customizer'.
  4. Check the box in front of the 'Cite While You Write' option.
  5. Click next until the Customizer is finished. Open a library.
  6. Then open Word 2016 and check the Ribbon for the EndNote tab.  (NOTE: The EndNote CWYW tools no longer appear under the Tools menu; rather appears as a separate tab in Word).

Check 2

Check your Mac OS security settings.
Mac OS Mojave and higher versions (macOS Mojave 10.14.6, macOS Catalina 10.15.7, macOS Big Sur 11.7, macOS Monterey 12.6) include new Security & Privacy functions which can prevent EndNote (CWYW Cite While You Write) from being able to correctly automate.

The error with normal visible and available EndNote 20 CWYW seen is: This version of the EndNote application is not compatible with Cite While You Write. The copy of EndNote currently running is located at: "/Applications/EndNote 20/EndNote 20.app
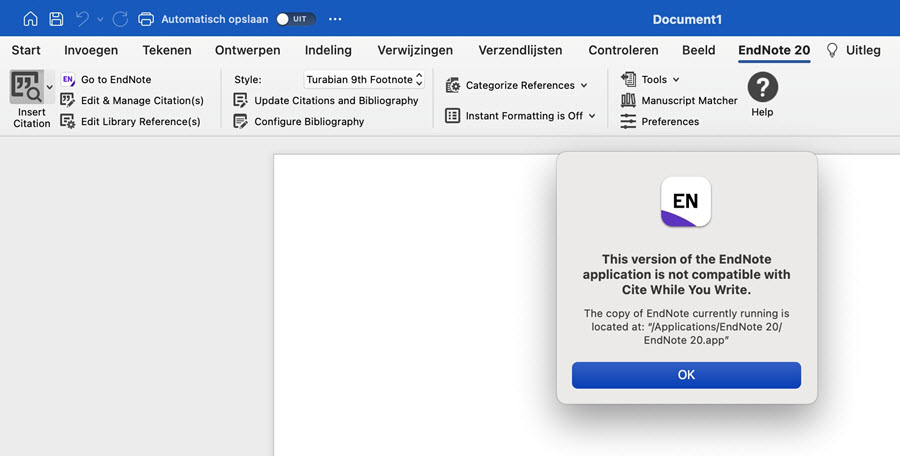
EndNote 20 macOS Mojave Catalina Big Sur Monterey EndNote CWYW

To correctly set these options:


  1. Close MS Word and EndNote.
  2. Go into the Apple menu.
  3. Click System Preferences.
  4. Click Security & Privacy.
  5. Click the Privacy tab (along the top).
  6. Click the Automation options, along the left.
  7. Here, make sure that both "Microsoft Word" and "EndNote X#" are both turned on.
  8. With this automation turned off, the EndNote CWYW Cite While You Write functions will not work in MS Word.


Check 3

  1. Close Word and EndNote.
  2. Open your hard drive and go to the following folder:

    EndNote X9: Applications: EndNote X9: Cite While You Write

    EndNote X8: Applications: EndNote X8: Cite While You Write
    or
    EndNote X7: Applications: EndNote X7: Cite While You Write
     
  3. Copy the file 'EndNote CWYW Word 2016.bundle' by highlighting the file and going to 'Edit > Copy'.
  4. Go to the folder '[Hard Drive Name] : Library : Application Support : Microsoft : Office365 : User Content : Startup : Word' and paste the file, 'Edit > Paste'.

    Note: If you have trouble finding the above location you need to click on Finder (in the Dock the icon of a face) to the right of Finder click on the Go menu then click on Computer then click on the Macintosh Hard Drive. You should then be able to follow the path above.
    Note: In non-English versions of Word, the folder named 'Startup' may be called 'Start' or be in the localized language of Word.
     
  5. Start Word, go to 'Word > Preferences' and click on 'File Locations'.
  6. If the Startup folder is set to any location, highlight 'Startup' (see above note at item 3) and click on 'Reset'.
  7. Click 'OK' and Quit Word.
  8. Start EndNote and then start Word

    Regarding step 3:

    NOTE: If you do not see the "EndNote CWYW Word 2016.bundle" file in the "Applications: EndNote X9: Cite While You Write" folder (or if this file is not the most up to date version), you can follow these steps: 
    Download a copy of the latest EndNote online tools here. Run this file and follow the steps to install the tools in Word.
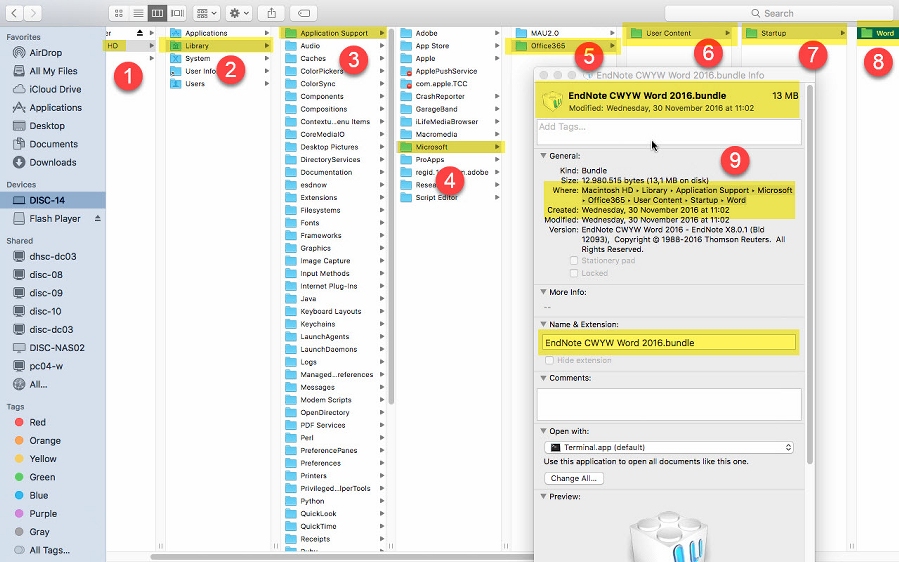
EndNote X8 CWYW Bundle OS X Sierra 10.12 MS Word 2016

14. How to add EndNote 21 Cite While You Write (CWYW) add-on in Google Docs via Marketplace

How to add EndNote 21 Cite While You Write (CWYW) add-on in Google Docs via Marketplace:

Open Google Docs

  1. Navigate to
    • Extensions
    • Add-ons
    • Get add-ons
  2. Search for: ‘EndNote’ of ‘cite while you write’ (Extension is named  ‘EndNote Cite While You Write™’)
  3. Click on the EndNote tile to open
  4. Click Install
  5. Review Terms & Conditions and privacy policy and click Continue to proceed.
  6. Sign into your Google account and allow ‘EndNote Cite While You Write™’ access to your Google account.
  7. Create a new document and open EndNote Cite While You Write Extension. ‘Open’ link may take a moment to appear, this is a function of Google.

Note: Security alert emails will be sent to the email account associated with the Google account; these are standard to notify access was granted to EndNote’s CWYW. Users may review activity and take action, if needed.

Important: For customers to log into CWYW in Google Docs, they must have an EndNote 21 enabled EndNote Web account. To activate their web account in EndNote 21, the user should go to ‘EndNote 21/Edit > Preferences > Sync > Enable Sync’.